There are three sections in an Arduino program. The Variable Section is used to declare global variables and/or import libraries (i.e., #include). Global variables are defined outside of all the functions so all functions can use them. The Setup Section is a function, void setup(), used to start tasks that need to be executed only once. Opening communication with the serial monitor is a good example, Serial.begin(9600);. The Loop Section, void loop(), runs as a continuous loop. It contains instructions that will be executed until the board is reset or turned off. It is where the I/O tasks of the microcontroller are defined and executed.
1. Install the Arduino IDE on your computer.
Installing the Arduino Desktop IDE: [Windows],[Mac OS]
2. Connect the board to your computer via the USB port.
3. Open the Arduino IDE.
 |
 |
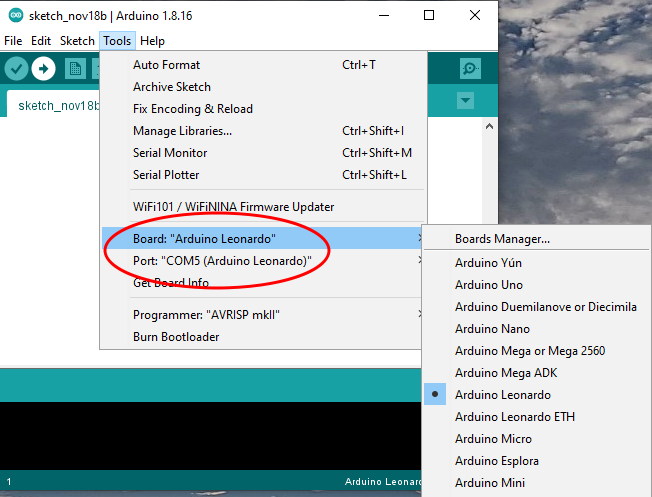
Check the board and COM port. Make changes if needed. |
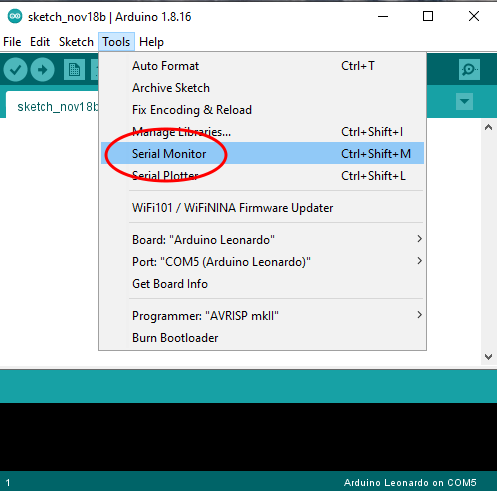
Open the Serial Monitor. |
The Serial Monitor is helpful for displaying input from sensors connected to the board. It can also be used for debugging a program. Printing variables as a program runs lets you see the execution. The Serial Potter is very useful also.
4. Now that the programming environment and board are connected,
 |
 |
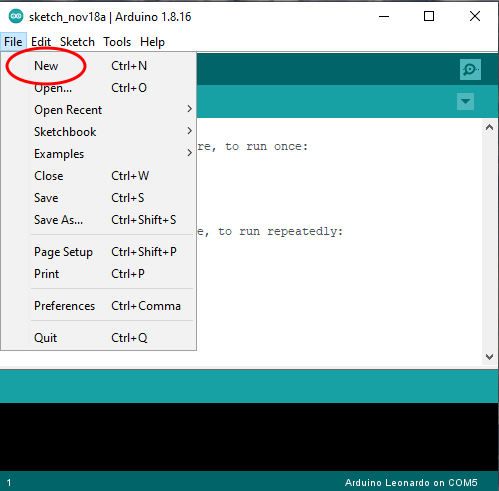
select [New] to open a new window. |
Then, [Select All] and [Cut] to create a blank workspace. |
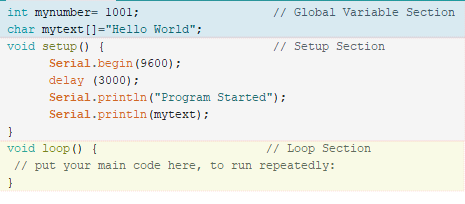
Give it a try. Copy the code below to your clipboard.
int mynumber= 1001;                   // Global Variable Section
char mytext[]="Hello World";
void setup() {                        // Setup Section
      Serial.begin(9600);
      delay (3000);
      Serial.println("Program Started");
      Serial.println(mytext);
}
void loop() {                        // Loop Section
 // put your main code here, to run repeatedly:
}
Then,
 |
 |
Paste the code into the IDE workspace. |
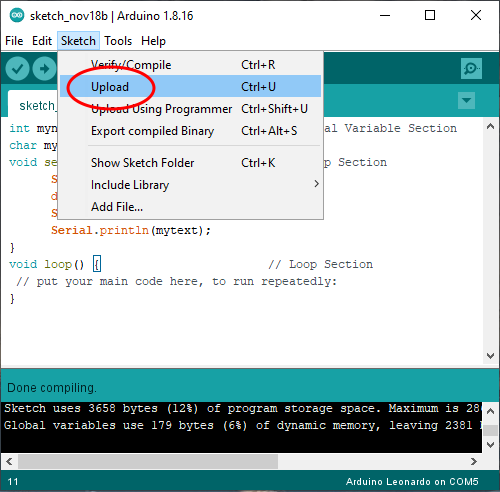
Upload and watch it run. Note: if you get a COM error, try recompiling, then upload again. |
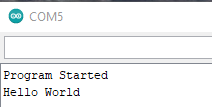
The code will begin to run immediately. Look at the serial monitor.
Notice that when you [Verify/Compile] or [Upload] a program, the message window at the bottom of the screen displays compiling status or errors. It will help with debugging.
Add a line in the setup() function to print the variable ‘mynumber’.
  Serial.println("Program Started");
  Serial.println(mytext);
 Serial.println(mynumber);
Upload the code with this change and see what happens.
Add a Serial.println() line in the void loop() function.
 void loop() {                        // Loop Section
 // put your main code here, to run repeatedly:
Serial.println(mytext);
Upload the program with this change. Observe the display. Is this what you expected?
A delay command, delay(1000);, after this print command will slow the loop so you can see the scroll.
 Serial.println(mytext);
delay(1000);
Change the numbers and text, then observe the results, experiment. Understanding the code structure, some basic commands, and edits you can make to customize the program is a good start to coding this microcomputer.